Zoom Audio Recording (‘Podcast’)
| Site: | Education Portal |
| Content: | Send us content / Self-recording |
| Book: | Zoom Audio Recording (‘Podcast’) |
| Printed by: | Guest user |
| Date: | Monday, 11 May 2026, 2:39 PM |
Description
How to record an audio discussion using Zoom.
1. Testing your Internet bandwidth
Before using this guide or undertaking a recording, you should ensure that your Internet bandwidth is sufficient to undertake recordings:
Zoom support system requirements
The minimum bandwidth
required is 600 kbps (upload/download).
You can check
your Internet bandwidth using Speedtest.
2. Download Zoom
- Download Zoom Desktop Client
- Read this Guide
Read this Guide and review Zoom’s online tutorials for additional help
3. Organise the meeting
Create a meeting using Schedule in the Zoom application
Use the default Zoom meeting settings and be careful when selecting the meeting date and time, ensuring that if there is a time zone difference between you and the guest(s) that you have double-checked that the meeting has the correct time as agreed with
the guest(s).
When you have created the meeting, you can copy the invitation by clicking on … and selecting Copy Invitation.

3.1. Template email to guest(s)
Send an invite email to the guest(s) using the template, attaching the DOI/permissions form and copying in cme@rcpe.ac.uk
4. Before the recording
Familiarise yourself with this Guide and the Zoom application. The Zoom control
panel (found at the bottom of the application) is clearly labelled:

Before the recording, ensure you have the most up-to-date version of Zoom (‘Check for Updates’ in the Zoom main menu) and ensure you are plugged in if using a laptop.
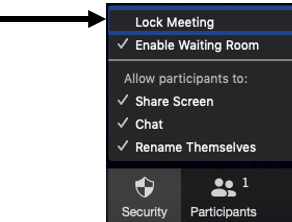
Lock meeting
When all participants are present, Lock Meeting using the security button:
Optimise connection
Everyone (including you) should optimise the connection to Zoom and minimise distractions.
In particular:- If possible, plug in the device being used to do the recording
- Ensure that mobile phones are on silent to avoid interrupting the recording
- If possible, shut down the email programme to avoid notifications interrupting the recording or causing distraction
- Ask that others in the household avoid ‘high bandwidth activities’ such as streaming video (e.g. Netflix, YouTube, Zoom) or playing online games.
Optimise audio quality:
- You may wish to have videos turned on, so you can have a ‘face-to-face’ conversation. However, clear audio is key, so consider turning off speaker videos if this improves audio
- Are there any distractions? Is an open window introducing traffic noise? Is there a clock ticking loudly? Are phones on silent? Is a device balanced on something that is creating a vibration on the audio?
- Is this the best audio possible? Do you/they have a USB headset with microphone? If so, which offers the best audio? NB: if the speaker has added an additional headset it may not automatically be chosen and will have to be selected from the Select a Microphone menu in Zoom
With a podcast recording, clear audio is vitally important. If audio is particularly poor you may have to consider re-arranging the meeting so that improved equipment is used (RCPE owns two mics which can be borrowed if available)
5. Practicalities of undertaking the recording:
Introductions/overview:
The host(s) should introduce themselves / each other at the start of their recording and outline the topic of the recording. If the recording forms part of a series, this should be stated (for example: “This is the Consultant Conversations podcast, brought to you by the Royal College of
Physicians of Edinburgh's Recently Appointed Consultants' (RAC) Committee”).
Stable
surface:
Check that devices are on a stable surface and avoid nudging this surface, which can disturb sound.
Present from
one comfortable position:
Everyone should sit comfortably and aim to speak clearly in a measured manner throughout (leaning towards/away from the camera can disrupt the
audio, if not using a headset).
Issues
during the recording:
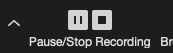
Explain to guests that if there are any issues (such as technical issues or if they need to pause the recording) it is best if they are silent for a few seconds before clearly stating "stop” – you as the recorder will Pause Recording :

Note: Please avoid using Stop Recording until the very end of the recording (because this will generate multiple audio files).
Resume
Recording when appropriate.
Their silence is noticeable on the audio trace which makes editing out the pause easier. However, please also take note of when the recording is paused if there are sections that should be removed during the edit.
Edits:
The Digital Education team (cme@rcpe.ac.uk) make edits. Examples include removing large pauses or raising the volume for a section if a speaker goes quiet, but for podcasts we also remove any 'dead space' including breaths and repetitions, to improve listener experience.
Mute phone:
Put phones onto silent / airplane mode to avoid a phone call disturbing the recording.
Before starting the recording, ask if the guest would like a glass of water, ask if they have any questions, and ensure they are happy to start.
Introduce the guest(s) at the start of their recording.
6. Doing the recording
Start recording:
Start recording (Record > Record on this computer).
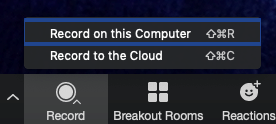
Note: If you are using your personal Zoom account, you will have to use ‘Record on this Computer’. You will be limited to 40 minutes - if you surpass this, start a new meeting and send all recording files. The recording will only be saved on your computer (there is no other back-up made).
You should therefore ensure that you have enough space on your computer to save a recording and be careful not to delete recordings or to remove the Zoom recordings folder. Await confirmation of safe receipt before deleting.
You will see the Recording icon flash in the top left of the screen when recording:
![]()
[Optional] Pausing the recording
If necessary, the recording can be ‘paused’ using Pause Recording. For example, if the guest(s) wants to pause, or if there is a technical issue such as the audio freezing.

Resume Recording when appropriate (do not use Stop Recording until the very end of the recording).
Ending the recording
At the end of the recording, use Stop Recording.
The recording will process and save to your computer when the meeting has ended.
Thank speakers and last requests
Ask if they are happy with the recording, or if they have any important edits.
Remind them to send:
- A headshot photograph, to use in publicity
- Completed and signed permissions/DOI/biography form
End the meeting
Select End Meeting (bottom right corner) and the recording will save to your computer.
7. Actions after the recording
Transfer files:
All audio files (.m4a) should be sent using the OneDrive link you have been provided with.
Email Digital Education team:
Send an email to the Digital Education team cme@rcpe.ac.uk, including:
- Any edits to be made (please include time stamps)
- Any links to add to show notes
The Digital Education team will confirm safe receipt of the file. Before this, do not delete any recording files.
Review link (optional):
The host(s) and guest(s) will be sent a copy of their edited recording which gives them the opportunity to review before publication.