How to record an audio discussion using Zoom.
6. Doing the recording
Start recording:
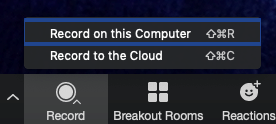
Start recording (Record > Record on this computer).

Note: If you are using your personal Zoom account, you will have to use ‘Record on this Computer’. You will be limited to 40 minutes - if you surpass this, start a new meeting and send all recording files. The recording will only be saved on your computer (there is no other back-up made).
You should therefore ensure that you have enough space on your computer to save a recording and be careful not to delete recordings or to remove the Zoom recordings folder. Await confirmation of safe receipt before deleting.
You will see the Recording icon flash in the top left of the screen when recording:
![]()
[Optional] Pausing the recording
If necessary, the recording can be ‘paused’ using Pause Recording. For example, if the guest(s) wants to pause, or if there is a technical issue such as the audio freezing.

Resume Recording when appropriate (do not use Stop Recording until the very end of the recording).
Ending the recording
At the end of the recording, use Stop Recording.

The recording will process and save to your computer when the meeting has ended.
Thank speakers and last requests
Ask if they are happy with the recording, or if they have any important edits.
Remind them to send:
- A headshot photograph, to use in publicity
- Completed and signed permissions/DOI/biography form
End the meeting
Select End Meeting (bottom right corner) and the recording will save to your computer.